 Running apple and pear trees in the form of a free line
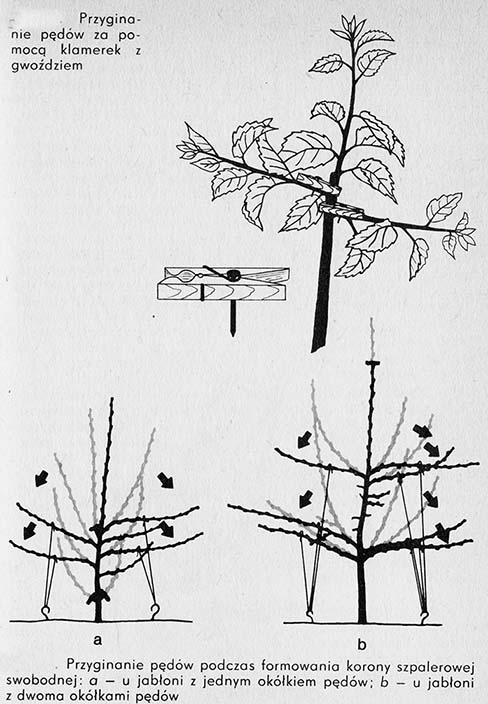
While forming a free line crown, we try to obtain a guide, on which horizontal branches are embedded, facing two opposite sides in the plane of the row. Form the lowest branches at a distance of approx 0,5 m from the ground, and the highest - 2,5 m. The number of branches and the distance between them are quite arbitrary. Using most of the shoots appearing on the guide for forming the limbs, we will get crowns having 10-12 branches. We form a lane crown by first of all bending the shoots. By bending the shoots, we give the shoots the right position and direction of growth. We force the tree to form a flat wall within three or four years after planting the orchard.
The pruning of trees in the first year after planting is similar to the formation of an almost natural crown. If branched trees are planted, they should be positioned in this way already during planting, so that the strongest gains are in the row of the row. Unbranched trees should be trimmed at a distance 60-80 cm from the ground. Branched trees should have their shoots removed from the bottom to the top 50 Cm, and above only those shoots, which grow exactly in the direction of the inter-row. Guides should be shortened to 50 Cm. The left side shoots can not be shortened, as long as it is possible to water the tree during a drought.
Free sheds are formed basically by planting annual trees. Can be used for this purpose, also biennial trees, especially when they have thin flexible branches, which can be properly bent in the first year. If the planted two-year trees have few and stiff branches, they should be removed. The conductor must then be trimmed at a height of 60-80 cm from the ground and start forming from the second year.
The formation of a lined crown can be improved by attaching the already described clasps to the guide. This must be done in May or June. Some fruit growers use staples with a nail inserted as shown in the picture. The clasp forces the rush to grow horizontally, and the nail directs the momentum towards the row.
We start bending the shoots for the second year after planting the orchard, and only when two-year-old trees were planted, it's already in the first year. In the spring, it is necessary to bend the shoots to a horizontal position and direct them to the plane of the row. Not all side shoots will bend. Some of them are too stiff, or they grow perpendicular to the row and these need to be cut. Bent shoots must be tied with strings in the desired position. You can tie them to the trunk, but it is inefficient work in forming the lanes. It is best to tie the shoots to hook pins stuck in the ground under the trees, at a distance of approx 0,5 m from the trunk. You have to drive under each tree 2 heels, exactly on the line of the row. The pins are readily made of wire 5-8 mm in diameter. The wire must be cut into lengths 70 Cm, and then bend one end into a hook. After bending the side shoots, shorten the guide to 50 cm above the last branch.
In some countries, lines are formed next to scaffolding consisting of posts and wires stretched between them. Such scaffolding is only necessary for dwarf trees. They will be described in the chapter on the formation of dwarf trees. Vigorously growing pear trees, and vigorously growing and dwarf apple trees do not require scaffolding. Bending shoots can be significantly improved by winding the string on a spool, which attaches to the belt.